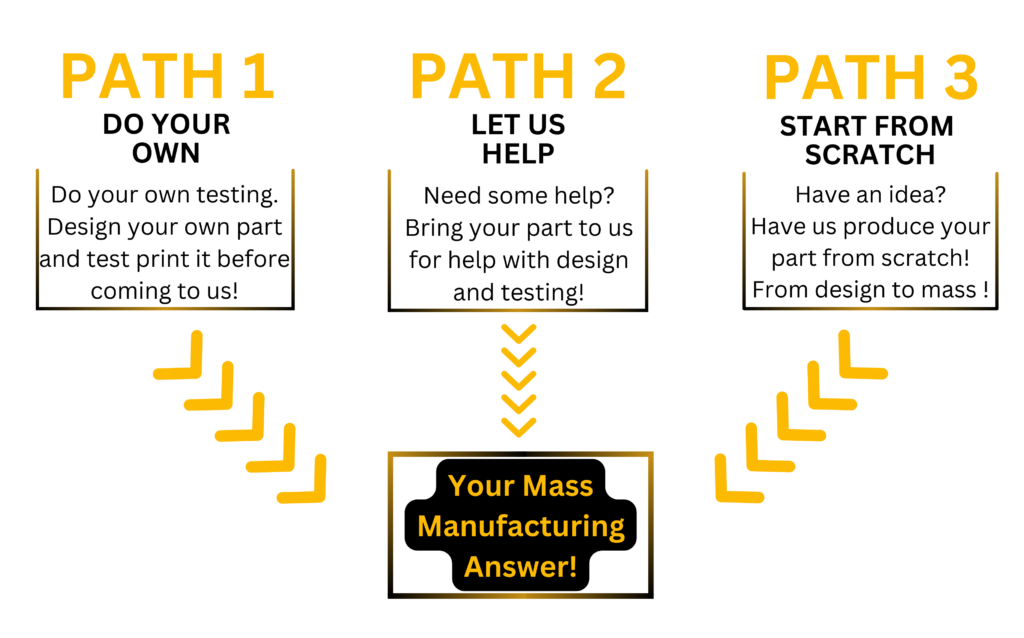
LET US HELP
This “Let Us Help” path is designed to provide a comprehensive, collaborative, and customized service, ensuring that your product design and manufacturing are optimized for quality, efficiency, and market success.
Purpose/Goal:
Welcome to our “Let Us Help” path, designed specifically for those who already have a part file but want help with design revisions for mass production. This is aimed to help innovate or optimize your part for the mass production process using more of our resources at Merit3D. We go through this process every day and are here to help.
Upload Your Part Here!
Step #1
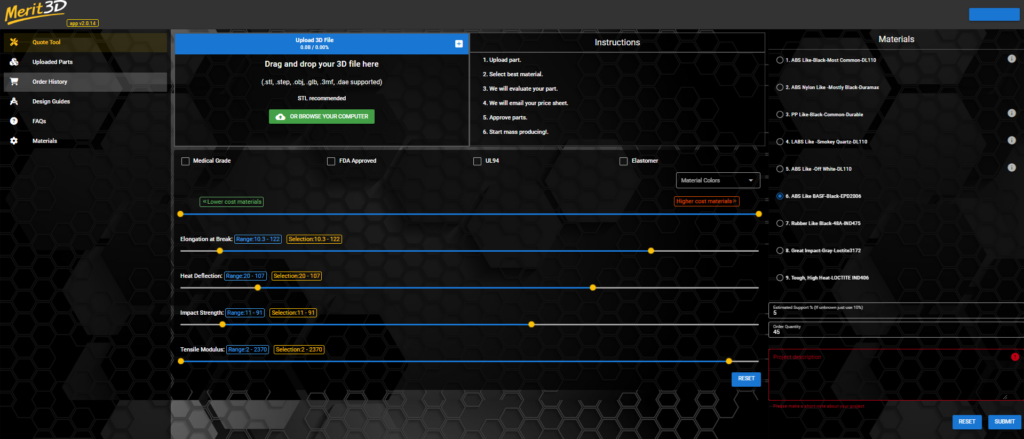
Upload Your Part To Our Instant Estimate Tool or Contact Form
Step #2
Fill Out The Project Requirements Form
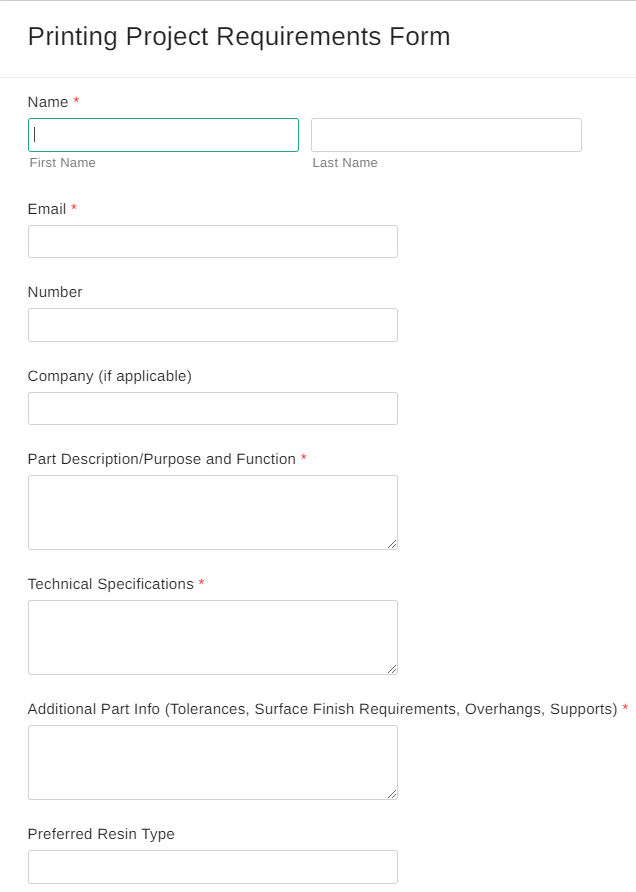
In this step, you upload your part and fill out the Project Requirements Form. This form will allow us to begin optimizing your part to the best of our abilities, while also allowing us to develop the mass manufacturing process for your specific project.
The project requirement form is designed to help us get all relevant information needed to mass produce your part.
This form will skip much of the back and forth emailing of questions and clarifications to make the manufacturing process easier. There will still be back and forth emailing and phone calls for questions from both sides, but in general the form will greatly increase the speed of the process.
You can find more explanation on the questions, as well as example answers here.
Part Description/Purpose and Function: (Example) This part is designed to hold my phone on my desk, it’s hollow and somewhat designed for 3d printing, and specifically for the Iphone 12 Pro.
This is to help us understand what your part is used for. By understanding, we can make better test parts by using what we know to avoid certain options and focus on others.
Technical Specifications: (Example) The phone holder needs to have as flat a surface as possible where the phone back will sit. The lip the phone sits on needs to be snug to the phone but not to tight so I can easily insert the phone and take it out, without the phone falling out from a small bump.
This is to tell us any specific surfaces geometries that are more critical to the part quality than others. We can print the part in most any orientation, but sometimes the surfaces cannot have support marks, or any other contusions.
Additional Part Info (Tolerances, Surface Finish Requirements, Overhangs, Supports): (Example) The phone holder has a small oval cutout at the bottom that lines up with the phone charging port. This tolerances needs to be within .25mm of the blueprint size. There are also small holes along the base that the phone back sits on, these are mainly to cut away resin usage, but need to be within .20mm to allow proper cooling.
This is to specify what the critical sections are, such as a hole needing to be a certain size, a surface needing to be a certain smoothness or roughness, or if we can’t use supports on certain surfaces.
Preferred Resin Type: (Example) The DL110HB material.
This tells us what material to begin our testing and printing. If you don’t know that is fine, we will work through it with you.
Material Strength/Properties Requirements: (Example) The material doesn’t have to be extremely strong, but needs to withstand small drops and repeated heavy use. A slight flex to the material is ok, but rigid is prefered. Needs to be black in color
This is to help us understand material properties that are needed for the part, some need to be flexible, and some need to be completely rigid. With any additional info on what the material is required to be like, we can make recommendations and send samples.
Layer Thickness: (Example) 250 Microns (Med-Fine)
This is for us to know what layer thickness to print at, the lower the layer thickness, the higher the quality. Some parts need 100 Micron layers to achieve the extra detail for close inspections. While some parts may be printed at 250 microns because they need the part faster and the detail quality isn’t as critical.
Printing Orientation: (Example) This part was designed to print stand up as it would be in use.
This helps us save material on testing and prototyping. If there is a specific surface the part was designed to print on, the testing phase becomes much faster and cheaper.
Any Additional Notes or Instructions: (Example) I’m interested in coloring options, I would like to discuss with someone any possibilities of getting these colored.
This is for any specific production or post production needs that we would need to know.
Project Deadline: (Example) 15/05/2025
This tells us when we need to have the part shipped to you.
File Upload: (Example) PhonestandV7.stl
This is how we get the part you’ve been describing. Without the part file, we either have to design from scratch with has a design fee; Or we have nothing to print.
Additional Questions? (Example) Can I have a call to discuss any possible design improvements that would save on my cost?
This is for any and all questions you may have.
Step #3
Get a Quote
In this step, customers will get a quote from Merit3D about their project.
Merit3D will send you a quote for an estimated time frame and cost. If design help is wanted or redesign is required, we offer our design services at the rate of $150/hr.
Most projects cost between $300 and $3000 for design services.
Step #4
Testing
In this step Merit3D will begin printing your part in different orientations in your material choice.
DFAM - Design For Additive and Mass Production
01: Overhangs
Check for sections of the part that extend outward beyond the layer below. In additive manufacturing, overhangs can be challenging to print without support structures. Look for angles greater than 45 degrees from the vertical, as these typically require additional support.
02: Wall Thickness
Identify any concave surfaces or ‘cupped’ areas. These can accumulate material during printing, affecting the part’s accuracy and finish. Ensure these areas are minimal or designed in a way that mitigates the risk of material distortion.
03: Cupping Spots
Measure the thickness of all walls in the part. Thin walls may not print correctly or might be too fragile, while very thick walls can lead to excessive material use and longer print times. A balance needs to be struck to ensure structural integrity without overusing resources.
04: Internal Channels
Examine any internal channels or hollow spaces. These can be difficult to print and may require special consideration for support removal and surface finish. The channels should be accessible for post-processing if needed.
05: Surface Detail
Assess the level of detail on the part’s surface. High detail areas may require slower print speeds and finer resolution, which can impact the overall manufacturing time and cost.
06: Material Compatibility
Ensure that the material you intend to use is suitable for additive manufacturing and meets the part’s functional requirements, such as strength, flexibility, and temperature resistance.
07: Assembly Requirements
If the part is a component of a larger assembly, consider how it will fit with other parts. Additive manufacturing allows for complex geometries, but they must align correctly with other components.
08: Heat Deflection
For parts that will be exposed to high temperatures, consider the heat deflection properties of the material. Some materials may warp or deform under heat, which could be critical depending on the application.
09: Finish & Aesthetics
Decide on the desired surface finish and appearance. Some printing processes leave a rough surface that may require post-processing for a smoother finish or aesthetic appeal.
10: Tolerance & Precision
Review the dimensional tolerances and precision required for the part. Additive manufacturing can achieve high precision, but it varies between technologies and materials.
Merit3D will work on your project and provide 1-2 iterations of your part. With the iterations, Merit3D will also provide a quick consultation on your project. Merit3D will also provide samples of other materials for your convenience.
Step #5
Mass Production
After reviewing your part and the samples in step 4, your part will either be approved, or need more testing/design.
If your product is approved, we move to MASS PRODUCTION!
If your product is not approved, simply go back to step 3 and repeat!
Need a different path?